Custom Night Lights
Posted on: Sep 27th, 2025 @ 9:33 pm
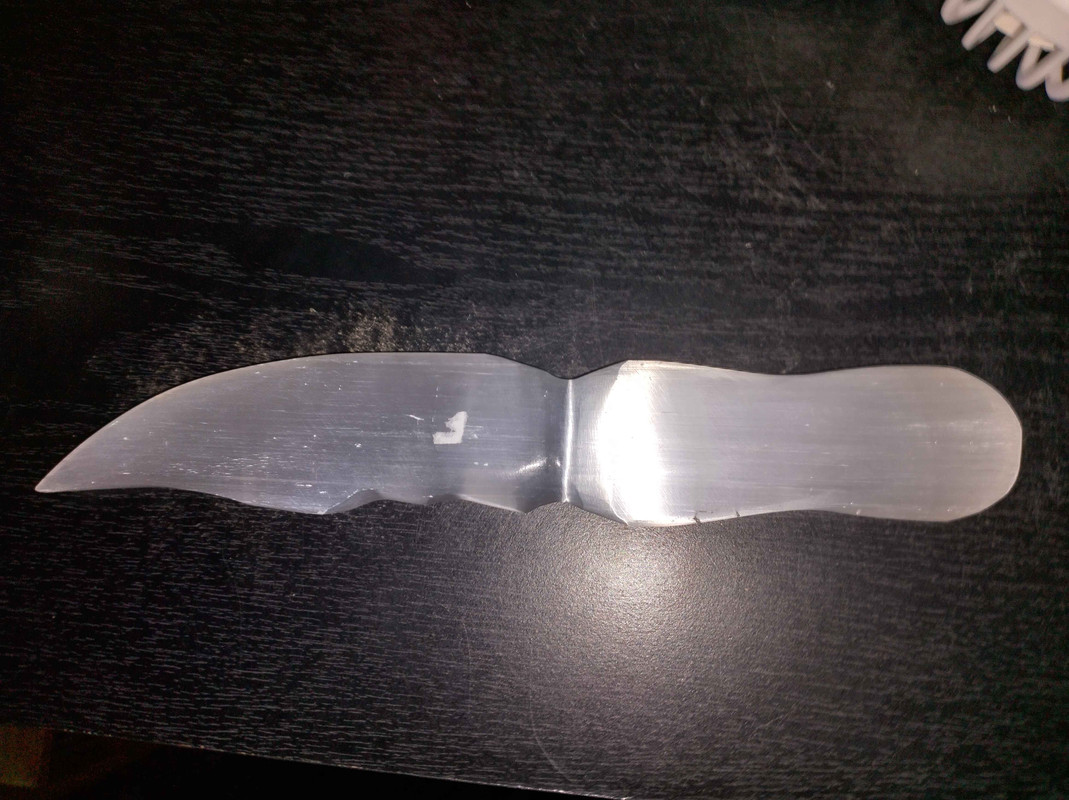
It all started with this. a dagger we got for my brother made from Selenite. nothing too special, but it's not hard to see that it has fiberoptic properties. All it needs is a stand, and a light source.
This took longer than it really should have, nearly a year went by before we got the stand prepared for the dagger, and a light mounted in the underside.
it's crude, and I was still learning, just as I am now. but the effect you get, just makes it all worth it.
Cut the lights, stick the dagger in the slot, and plug the USB cord into a phone charger. We have, a night light. the diode is all the way at the bottom of this stand, and just shining upwards. this definitely did the trick, and my brother was happy with it. it cycles through the entire spectrum. red, green, blue, cyan, magenta, yellow, and white.
I'm quite proud of this, crude as it is.
So, fast forward to about a week ago. I've learned quite a bit about 3d printing, and, had opted out of joining my family on a camping trip to make sure the house is taken care of.
My family gets back, and I'm handed a balled up newspaper, containing an egg made from selenite, and a wand, also made from selenite... still thinking of what to do with the wand, but...Well I bet you have all already figured out what I planned to do with the egg, if not, you'll see in just a moment.
This was a bit of a challenge, utilizing whatever I had for filament on hand, after a marathon run of prints to get my inventory up for a christmas bazar in december.
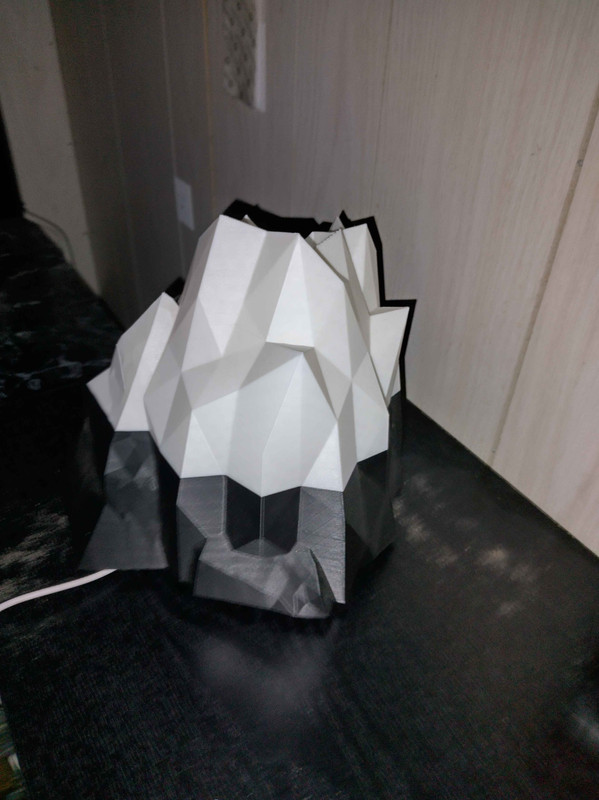
I downloaded this model from
https://www.myminifactory.com/object/3d-print-koholint-island-86281 and gave it a quick inspection. I knew the dimensions on my egg were different, so I did a quick measure with some calipers, and applied the new dimensions to the egg supplied with this model. this gave me the offset percentages to apply to everything to make my egg work.
in this case, X101.83% Y101.83% Z129.72% (Meaning it is actually quite stretched on the vertical axis.) I simply had to apply all this to every piece of the model.
One other adjustment was made...I decided I didn't like the flat bottom on that cloud, so after the scale was made permanent, I took the cloud, reduced it's vertical size by 50% then made a mirror copy. glue those together, and, no more flat bottom on the cloud.
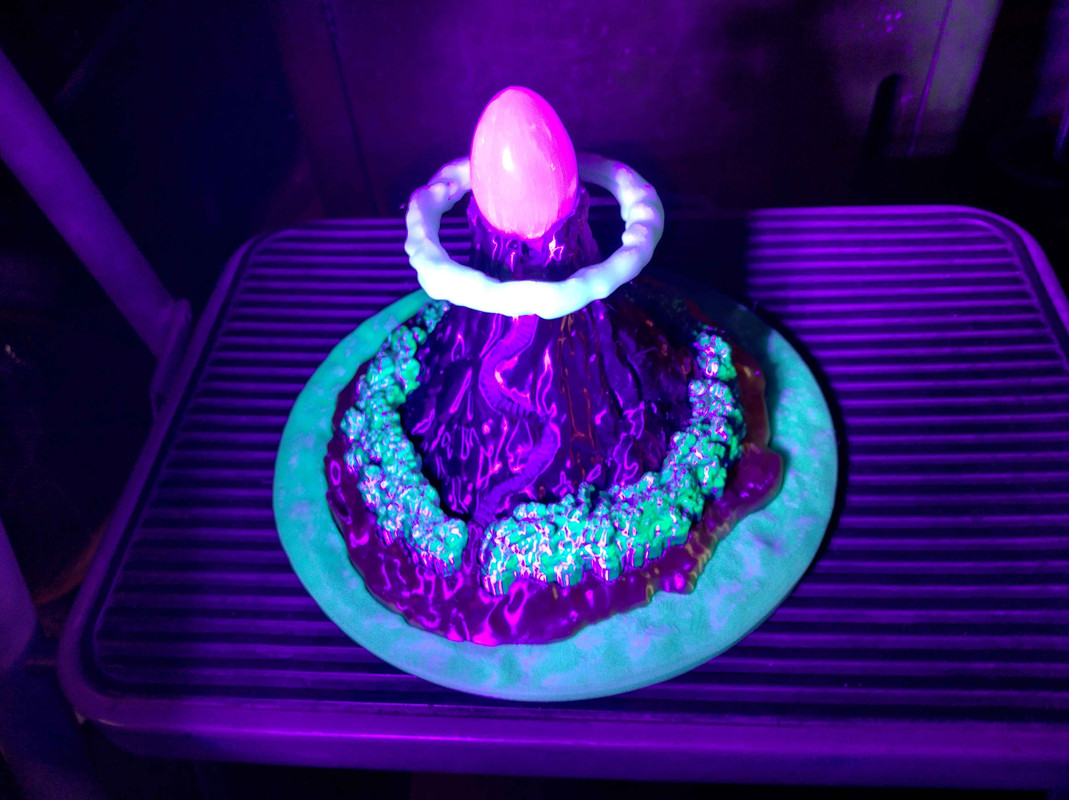
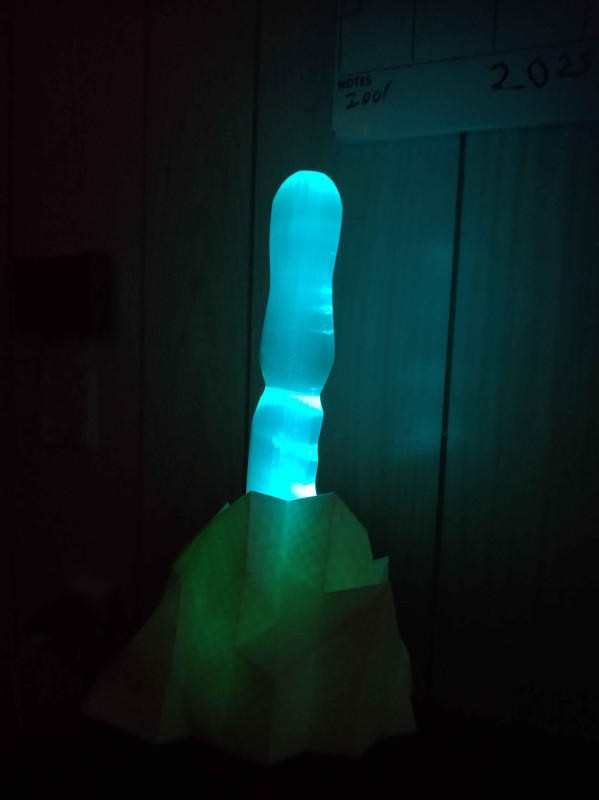
I was charging up the glow in the dark parts with a UV curing light when I got this picture. I didn't expect the trees to light up like this. looks pretty dang cool I think.
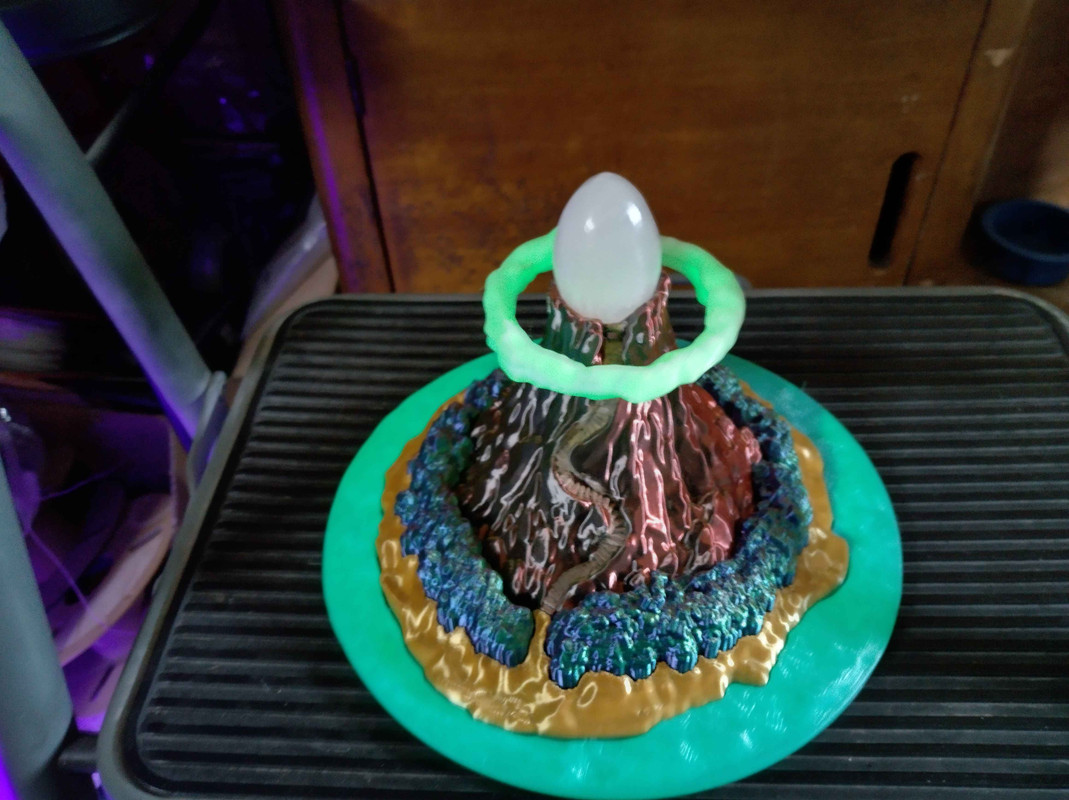
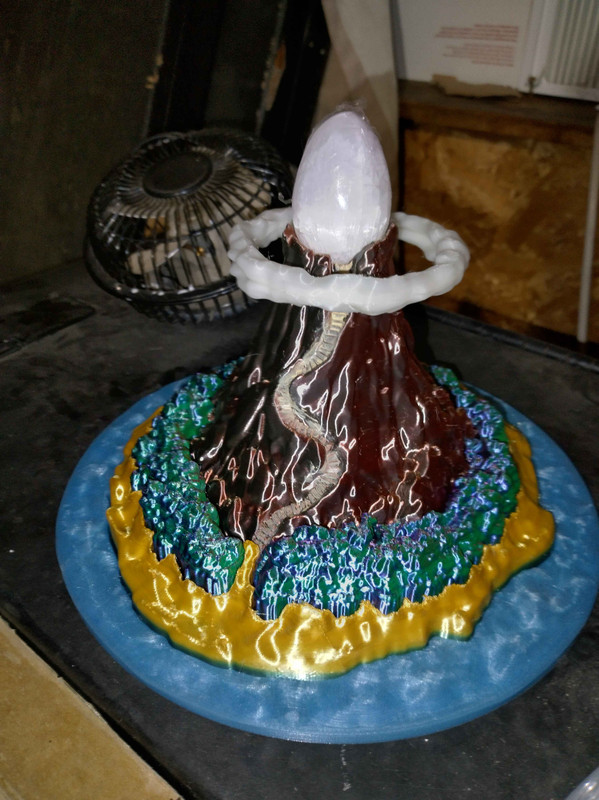
And finally, in low light with the glow parts charged. save for the LED, this is completed.
I'll share the final result once I get that installed. (It's expected to be here in a couple of weeks)
This was actually a lot of fun to do, and I'm very much proud of the result here. I hope you all had as much fun looking at all this as I did putting it together.
Let me know what you think!
Just got my new speakers
Posted on: Aug 12th, 2025 @ 4:01 am

Something just satisfying about this setup, ya know? Just a case of "If it's worth killing, it's worth overkilling" and things just sound amazing through this setup... driven by a 2000 watt car stereo I found on ebay... also I have some comedically huge computer speakers now!
AI upscaled Mario Paint coloring book page.
Posted on: Jan 2nd, 2022 @ 5:11 pm
Ended up upscaling one of the coloring book pages from Mario Paint so that it could be printed.
Here's the result.

(Original, for reference)

(Upscaled) This can be printed using a printer now, without it being pixilated or blurry.

(Printed, and colored in)
I got bored and found a box of color crayons, then colored the page in...
I dare say, this was fun.
Anyway, do as you wish with the results. don't need to ask permission, and no credit needed.
Have Fun!
Getting a cutting machine for Christmas
Posted on: Nov 14th, 2021 @ 4:46 pm
Not much I can really say just yet about this thing, since it hasn't even been shipped yet, but. I've come up with a few things to try when it arrives, after testing out the software, and learning what formats work with it.


Nothing too special here. just going to recreate my favorite coffee cup.

This was dumped from Batman: Arkham Asylum. converted to vectors nicely. I think this would make an awesome T-shirt.
I'll be able to share more once the machine actually arrives. Kinda excited to try it out!
Arcade1up mod project.
Posted on: Jun 6th, 2021 @ 6:24 pm

Was given this for my birthday this year. (Which actually isn't until July)
Definitely a fun unit. And you can't go wrong with Pac-man! (My one gripe would be JUST HOW FREAKING LOUD IT IS!!! even at it's lowest possible volume)
I've been getting components to install a Raspberry Pi in this thing. I currently have a 3b+. but thanks to fireball's input, at some point I will upgrade to the 4, and get some serious gameage going.
It didn't take long to get the raspberry pi configured to display properly on the vertical screen.
Part of this is a challenge. My goal is to not install anything that cannot be undone. Being able to reassemble this thing to it's default state is key.
This said, I have researched a bit and found the parts to install the coin door, and get it fully functioning.
https://www.tulsaarcades.com/store/p32/1upxrdoor.html#/
https://shop.xgaming.com/products/arcade1up-arcade-coin-door-add-to-any-1up-machine
These two components cost almost as much as the entire cabinet...Skipping for now, as other commands allow for credits to be added, and this is more for aesthetics anyway. In the meantime, I plan to research a bit further so I might get this a bit cheaper.
Also skipped was the riser block
https://www.walmart.com/ip/Arcade1UP-Riser/963795060
I'll eventually get one of these. but for now, I don't exactly need it.
The rest I got from eBay.
https://www.ebay.com/itm/362610828560?ssPageName=STRK%3AMEBIDX%3AIT&var=631758706211&_trksid=p2060353.m2749.l2649 2-player control deck. (Possible further modfications needed to THIS PART due to the shape of the cabinet.) Spray paint and decals should work for making it match the rest of the cabinet.
https://www.ebay.com/itm/192681813877?ssPageName=STRK%3AMEBIDX%3AIT&var=492820814333&_trksid=p2060353.m2749.l2649 microswitch buttons. (2 quantity ordered)
https://www.ebay.com/itm/132545248146?ssPageName=STRK%3AMEBIDX%3AIT&_trksid=p2060353.m2749.l2649
joysticks (2)
https://www.ebay.com/itm/184845599428?ssPageName=STRK%3AMEBIDX%3AIT&var=692624392242&_trksid=p2060353.m2749.l2649
USB Encoder boards (2)
https://www.ebay.com/itm/173998892879?ssPageName=STRK%3AMEBIDX%3AIT&_trksid=p2060353.m2749.l2649
LCD driver board
https://www.ebay.com/itm/163413002318?ssPageName=STRK%3AMEBIDX%3AIT&_trksid=p2060353.m2749.l2649
Stereo speaker amplifier kit. (I might not use the included speakers) This will also serve as volume control
https://www.ebay.com/itm/194126094562?ssPageName=STRK%3AMEBIDX%3AIT&_trksid=p2060353.m2749.l2649
3.5mm 4-pole jacks [female]. (If I did my research correctly, this will allow me to connect the stock speakers to the new amplifier... although I only actually need one of these.)
As you have likely noticed, a lot of these components are coming from china.
It could be a month or more before I actually get this project started. although all have been ordered.
In the meantime, I have to deal with my long time rival and arch nemesis: Dragon's Lair!
...seriously though, I've never been able to get this game working.
Google image search for the Double Baconwich
Posted on: Nov 12th, 2020 @ 9:16 pm

The funny thing is: None of the food results actually got it right.
Nite SodaStream Alchemy
Posted on: Jul 2nd, 2020 @ 8:15 pm
So, okay, I actually got it exactly one month early, since my birthday isn't until July 24th, and I received it June 24th.
Not much to say really. I like the thing, and I do find it fun to try carbonating things...with varying degrees of not recommended...
(Apple Juice in particular is pretty good carbonated, though.)
I have one of the non-electric units. with a push-button on the top. (They call this one the "Fountain")
I can't imagine why one of these would really need electricity. If I had one of those, I would likely find out how to trip the system manually.
Currently, I've only tried 3 of the flavors available.
Cola, Dr. Pete, and Pina Colada Mocktail.
Cola isn't bad, reminds me of the Walmart store brand. Closer to pepsi. I think some lime might offset the sweetness a bit.
Dr. Pete, from the perspective of someone who doesn't usually drink dr. pepper, is decent. closer to root beer.
and Pina Colada is
TERRIBLE!
This is from the perspective of someone who actually likes Pina Coladas.
Other flavors are available, but due to a shortage, and an unwillingness to try the 0 calorie and diet verities, those are all I've tried.
(Seriously, I might have even tried the Extreme Energy flavor if it wasn't sugar free)
All the sweetened ones are advertised to have 1/2 the sugar of regular soda...not sure I believe it.
Other experiments, such as juice, tea, etc, go directly against the warning in the manual stating that this is a very bad idea....
...But when has that ever stopped me, MWAHAHAHAHAHAHAHA!
So far I've tried:
Tampico fruit punch, which ended up more sour. Not bad.
Cold Coffee....which I would rather not describe the results of...
Iced Green Tea (Arizona), which made it less sweet... I would say this is so-so.
Apple Juice, as noted above. Less sweet, but smooth. the carbonation really compliments this stuff. This would be good for holidays.
And a recipe I heard from Dr. Stone (Anime)... THIS is interesting on so many levels, and leads me to wonder how accurate the things I don't understand from the anime are. The recipe is Cilantro, lime zest, lime juice, and caramelized honey. I need to figure out the actual amounts, but, I can't believe that this worked so well. My result tasted like watered down Pepsi.
I've also invested in two additional carbonating bottles, as well as two additional CO2 tanks.
While services exist to exchange, or refill an empty tank, research suggests I can do so using dry ice.
While again, THIS GOES DIRECTLY AGAINST THE WARNING LABEL, AND THE WARANTEE, I should be able to refill a canister by matching the weight ratio printed on the bottle.
It's also good to know that those services exist, since I cannot get dry ice in the winter time.
I may find myself investing in a full-sized CO2 welding tank at some point. those can also be used.
As a side experiment: I'm also researching the possibility of using the canisters as a computer duster. CO2 is the exact opposite of flammable, I just think it would work well... no results as of yet.
Tiny Tobasco!
Posted on: Dec 15th, 2019 @ 8:46 pm

Adventures in 3d printing.
Posted on: Jul 30th, 2019 @ 9:39 pm

Last year, I acquired an Anet A8 3d printer from my family, as a christmas present.
After looking them up, they are rather inexpensive compared to most, and assembly is definitely required.
They are definitely also not one to count out either. while they take a good deal of work, they do produce quality results if you have your settings right.
Most of the stuff you need to start is free. Ultimaker Cura works great for getting the files set up properly.
Some code required, but the work is already done there, and just needs to be copied, and pasted into the right areas.
Once I got that set up, and the bolts tightened, I was ready to do my first prints... needless to say I failed... a lot....
Things got better after learning that PLA binds to blue painters tape like it was glue.
I was however able to print one important thing.
<div>
https://www.thingiverse.com/thing:2059082 (Spool bolt) The giant bolt and nut from this model
It wasn't perfect, but it worked well enough that it was able to spool by itself properly without needing to be constantly monitored. I may reprint this eventually, and get the spool guide set up.
</div>
I eventually learned that I was leveling the print bed wrong. It doesn't refer to actual level, but level in relation to the position of the extruder head. once I had that, I was more or less good to go for my first, at least partly successful prints.
Theese ended up being a few parts that were not included in the kit.
https://www.thingiverse.com/thing:2149867 Y (Bed) belt tentioner,
https://www.thingiverse.com/thing:2507473 X (Extruder) belt tentioner
These two parts are key to making anything with any amount of precision. as they get the belts tighter than is doable in the assembly process.
I had to do them twice, because the belts were loose when printing initially. and the resulting parts needed to be forced together.
The 2nd attempts worked perfectly, however. I shot for a level of tension that allowed the belts to vibrate much like the E string on a bass guitar.
Less slack=Higher precision
Once I had those, I had my first precision parts. They amounted to being basically nuts and bolts, but still. they worked!
I did end up needing a few more things. but those were able to be gotten at the dollar store.
A sheet of glass, and binder clips...
It turns out that glass makes the perfect surface for PLA plastics. I just took one out of a dollar store picture frame and held it on with some binder clips. It's a bit ugly to look at, but it works like a charm.
The object bonds to the surface while printing, and breaks off easily when it's finished and cooled off.
Once the excess is scraped off, simply cleaning the surface with glass cleaner makes it ready for the next print.
The rest comes down to configuring the print settings. This comes down to good old trial and error.
My prints are rather slow, compared to many other people's, With a max print speed of 60 mm/s, a layer height of 0.06 mm/layer, and the infill being set to 100% for most tasks, things can take a day or more to print. My settings are unusual compared to most however, but this guarantees me the best possible print quality.
In the case of the object being printed in the picture above, which is handle grips for Nintendo Switch in portable mode, it's expected to take 6 days, and two hours to complete. That picture was taken at around 30% completion on day 3.
So far my printouts have been relatively few.
In addition to the things noted above, I have also printed:
4 Raspberry Pi B+ housings
Various nerf gun parts
1 Raspberry Pi 4 housing
A Mario themed ? block coin case with lid
A dead-bolt for my bedroom door.
A small sprocket chain (as a fully assembled linked part test, [Test Successful])
Currently active print (As of typing)
Handle grips for Nintendo Switch: portable mode (3 days of 6 expected. no problems in printing)
And for things that were actually my own work:
An [poor] attempt at a virtual sculpture of a head (As of writing this, this is the only 3d printed object that is of my own creation)
And things in planning:
RC Car/truck body(s) ... So far hasn't gone through however...
The Meg II is going to be even bigger than The Meg!
Posted on: Mar 25th, 2019 @ 9:19 pm

Pleasedontkillme
